
Event-driven systems have well-known advantages and most modern distributed system architectures leverage events to reduce latency, improve scalability, and overall, make everybody’s life a little bit easier.
But what happens when integration with a legacy system (non-event-driven) needs to happen? Are we ready to sacrifice the benefits of event-driven architectures, or will we spend time, effort and money to build and event source based on the legacy system?
CDC comes to the rescue
Ok, but what is CDC? Looking at the literature, CDC is described as “data integration pattern”, which aims to identify and track data changes (inserts, updates and deletes) in a source database and make them available to downstream systems in near-real-time. This differs from traditional ETL where such detections are done based on a schedule and usually need to copy the entire dataset (batch processing).
There are a few more nuances to the CDC pattern, which won’t be covered today but are worth a read.
Debezium as a CDC platform
Debezium is an open-source, distributed platform for change data capture (CDC). It works by constantly monitoring databases (usually using its replication model) and then streams row-level changes.
It is built on top of Apache Kafka, which means that with a few configuration we can see our database changes being published into Kafka topics as change events.
Debezium supports PostgreSQL, MySQL, MongoDB, Oracle, SQL Server, …. so most likely your database system is covered. The supported list of databases can be found here: https://debezium.io/documentation/reference/3.1/connectors/index.html
Our setup
For our setup, we’ll use docker and docker compose (so you’ll need docker and docker compose) to create the following:
- a PostgreSQL 17 database with a single user table. We’ll enable full replication on startup
- a standalone Kafka broker (using Kraft) using plaintext and no authentication (so not very secure, but enough for our goal today. For more information on deploying a secure scalable Kafka cluster with strimzi, check this article)
- a debezium connector container where we’ll configure our connection to the database
- a very simple python-based Kafka consumer so we can output the events generated by our inserts, updates and deletes.
We’ll start by creating a docker-compose file with the 3 services mentioned above (PostgreSQL, Kafka and debezium connect):
name: debezium
services:
  kafka:
    image: confluentinc/cp-kafka:7.9.0
    hostname: broker
    container_name: broker
    ports:
      - "9092:9092"
      - "9101:9101"
    environment:
      KAFKA_NODE_ID: 1
      KAFKA_LISTENER_SECURITY_PROTOCOL_MAP: 'CONTROLLER:PLAINTEXT,PLAINTEXT:PLAINTEXT,PLAINTEXT_HOST:PLAINTEXT'
      KAFKA_ADVERTISED_LISTENERS: 'PLAINTEXT://broker:29092,PLAINTEXT_HOST://broker:9092'
      KAFKA_OFFSETS_TOPIC_REPLICATION_FACTOR: 1
      KAFKA_GROUP_INITIAL_REBALANCE_DELAY_MS: 0
      KAFKA_TRANSACTION_STATE_LOG_MIN_ISR: 1
      KAFKA_TRANSACTION_STATE_LOG_REPLICATION_FACTOR: 1
      KAFKA_JMX_PORT: 9101
      KAFKA_JMX_HOSTNAME: localhost
      KAFKA_PROCESS_ROLES: 'broker,controller'
      KAFKA_CONTROLLER_QUORUM_VOTERS: '1@broker:29093'
      KAFKA_LISTENERS: 'PLAINTEXT://broker:29092,CONTROLLER://broker:29093,PLAINTEXT_HOST://0.0.0.0:9092'
      KAFKA_INTER_BROKER_LISTENER_NAME: 'PLAINTEXT'
      KAFKA_CONTROLLER_LISTENER_NAMES: 'CONTROLLER'
      KAFKA_LOG_DIRS: '/tmp/kraft-combined-logs'
      CLUSTER_ID: 'MkU3OEVBNTcwNTJENDM2Qk'


  postgres:
    image: postgres:17
    environment:
      POSTGRES_USER: debezium
      POSTGRES_PASSWORD: dbz
      POSTGRES_DB: inventory
    volumes:
      - ./init.sql:/docker-entrypoint-initdb.d/init.sql
    ports:
      - "15432:5432"
    command: ["postgres", "-c", "wal_level=logical", "-c", "max_replication_slots=10", "-c", "max_wal_senders=10"]

  connect:
    image: debezium/connect:2.5
    depends_on:
      - kafka
      - postgres
    ports:
      - "8083:8083"
    environment:
      BOOTSTRAP_SERVERS: broker:9092
      GROUP_ID: 1
      CONFIG_STORAGE_TOPIC: my_connect_configs
      OFFSET_STORAGE_TOPIC: my_connect_offsets
      STATUS_STORAGE_TOPIC: my_connect_statuses
      KEY_CONVERTER: org.apache.kafka.connect.json.JsonConverter
      VALUE_CONVERTER: org.apache.kafka.connect.json.JsonConverter
      CONNECT_REST_ADVERTISED_HOST_NAME: connect
      CONNECT_PLUGIN_PATH: /kafka/connect,/usr/share/java
      POSTGRES_HOST_AUTH_METHOD: trust

networks:
  default:
    name: debezium-net
Alongside, we’ll need to provide the SQL init script for the database where we’ll create a very simple users table with an id, a first and last names. Nothing too fancy.
init.sql:
CREATE TABLE users (
    id SERIAL PRIMARY KEY,
    first_name VARCHAR(255),
    last_name VARCHAR(255)
);
Once all this is setup we’ll start our compose. We’ll run it in attached mode so we can monitor the logs
docker compose upInitially the connector may throw some errors while the Kafka cluster initializes, but it should stabilize after a few seconds.
Once it’s all stable, we’ll need to create the connector configuration.
Create the debezium-connector.json file with the following content:
{
  "name": "user-connector",
  "config": {
    "connector.class": "io.debezium.connector.postgresql.PostgresConnector",
    "database.hostname": "postgres",
    "topic.prefix": "user-db-topic",
    "database.port": "5432",
    "database.user": "debezium",
    "database.password": "dbz",
    "database.dbname": "dbz",
    "database.server.name": "user-db",
    "table.include.list": "public.users",
    "plugin.name": "pgoutput",
    "slot.name": "debezium",
    "publication.name": "dbz_publication"
  }
}
This is where we’ll tell our debezium connector container how to connect to our database. It includes the database connection (db, user, pass and host), but also which tables to include for CDC and how to prefix topics.
Note that topics will be table specific and will follow this structure “prefix.schema.table”.
To apply this connector config, use the debezium API:
curl -i -X POST -H "Accept:application/json" -H "Content-Type:application/json" localhost:8083/connectors/ -d @debezium-connector.jsonIt should return a 201 status code, indicating the connector has been created.
Now we can fire our Kafka consumer.
It’s recommended that a virtual environment is created:
python3 -m venv venv
source venv/bin/activate
(Note: this could differ base on you operating system)
then install the confluent_kafka package:
pip install confluent_kafkaIn a consumer.py file add the following code:
from confluent_kafka import Consumer

conf = {
    'bootstrap.servers': 'broker:9092',
    'security.protocol': 'PLAINTEXT',
    'group.id': 'python-consumer-group',
    'auto.offset.reset': 'earliest'
}

consumer = Consumer(conf)
consumer.subscribe(['user-db-topics.public.users'])

print("Listening for change events...")

try:
    while True:
        msg = consumer.poll(1.0)
        if msg is None:
            continue
        if msg.error():

            print("Consumer error: {}".format(msg.error()))
            continue
        print(f'Received message on topic {  msg.topic()}: {msg.value()}')
except KeyboardInterrupt:
    pass
finally:
    consumer.close()
Note: since the kafka broker responds as broker, it may be required to add an entry to your hosts file for proper resolution
sudo echo “127.0.0.1 broker” >> /etc/hostsThen run the consumer:
python3 consumer.pyLeave it running, and ensure there are no errors. It’s now time to start adding, changing and deleting data from our database:
Adding a user:
docker exec debezium-postgres-1 psql -U debezium -d userbase -c "insert into users values(10,'first','last');"Updating it:
docker exec debezium-postgres-1 psql -U debezium -d userbase -c "update users set first_name='hello' where id=10"And deleting it:
docker exec debezium-postgres-1 psql -U debezium -d userbase -c "delete from users where id=10"At every operation your python consumer should be outputting some JSON data from the generated events:
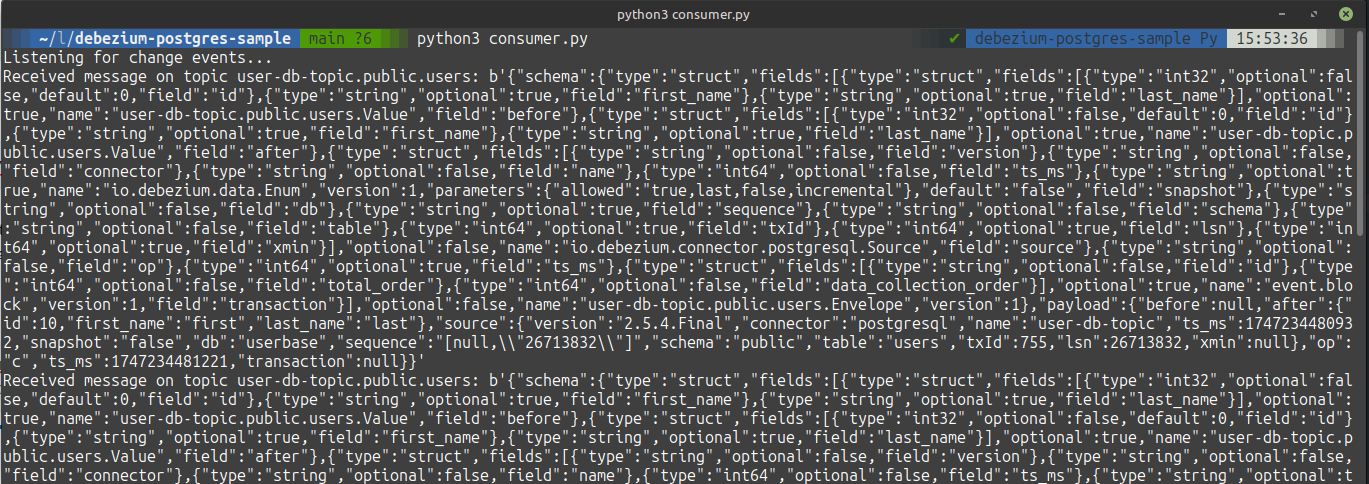
Let’s analyze the one from the delete:
{
  "schema": {
    "type": "struct",
    "fields": [
      {
        "type": "struct",
        "fields": [
          { "type": "int32", "optional": false, "default": 0, "field": "id" },
          { "type": "string", "optional": true, "field": "first_name" },
          { "type": "string", "optional": true, "field": "last_name" }
        ],
        "optional": true,
        "name": "user-db-topic.public.users.Value",
        "field": "before"
      },
      {
        "type": "struct",
        "fields": [
          { "type": "int32", "optional": false, "default": 0, "field": "id" },
          { "type": "string", "optional": true, "field": "first_name" },
          { "type": "string", "optional": true, "field": "last_name" }
        ],
        "optional": true,
        "name": "user-db-topic.public.users.Value",
        "field": "after"
      },
      {
        "type": "struct",
        "fields": [
          { "type": "string", "optional": false, "field": "version" },
          { "type": "string", "optional": false, "field": "connector" },
          { "type": "string", "optional": false, "field": "name" },
          { "type": "int64", "optional": false, "field": "ts_ms" },
          {
            "type": "string",
            "optional": true,
            "name": "io.debezium.data.Enum",
            "version": 1,
            "parameters": { "allowed": "true,last,false,incremental" },
            "default": "false",
            "field": "snapshot"
          },
          { "type": "string", "optional": false, "field": "db" },
          { "type": "string", "optional": true, "field": "sequence" },
          { "type": "string", "optional": false, "field": "schema" },
          { "type": "string", "optional": false, "field": "table" },
          { "type": "int64", "optional": true, "field": "txId" },
          { "type": "int64", "optional": true, "field": "lsn" },
          { "type": "int64", "optional": true, "field": "xmin" }
        ],
        "optional": false,
        "name": "io.debezium.connector.postgresql.Source",
        "field": "source"
      },
      { "type": "string", "optional": false, "field": "op" },
      { "type": "int64", "optional": true, "field": "ts_ms" },
      {
        "type": "struct",
        "fields": [
          { "type": "string", "optional": false, "field": "id" },
          { "type": "int64", "optional": false, "field": "total_order" },
          {
            "type": "int64",
            "optional": false,
            "field": "data_collection_order"
          }
        ],
        "optional": true,
        "name": "event.block",
        "version": 1,
        "field": "transaction"
      }
    ],
    "optional": false,
    "name": "user-db-topic.public.users.Envelope",
    "version": 1
  },
  "payload": {
    "before": { "id": 10, "first_name": null, "last_name": null },
    "after": null,
    "source": {
      "version": "2.5.4.Final",
      "connector": "postgresql",
      "name": "user-db-topic",
      "ts_ms": 1747234519868,
      "snapshot": "false",
      "db": "userbase",
      "sequence": "[26714328,26714384]",
      "schema": "public",
      "table": "users",
      "txId": 757,
      "lsn": 26714384,
      "xmin": null
    },
    "op": "d",
    "ts_ms": 1747234520216,
    "transaction": null
  }
}
It’s possible to see the schema of the before and after data sets (which is the same in our case) is available, as well as the before and after values. In our case the after value is null, as we are deleting the user. We can also see the operation (op) is set as delete (d).
Wrap up
And that’s it. Now we can start creating our event driven data flows based on changes to our users table.
We can also plug the JDBC sink and forward these changes to other database:https://debezium.io/documentation/reference/3.1/connectors/jdbc.html
Reference repository: https://github.com/CarlosRodrigues/debezium-postgres-sample
I hope this has been useful and that it helps unlocking new event-driven scenarios.
Cheers
Be First to Comment